

0
Criando Efeito Smoke no Photoshop(Efeito Fumaça)


Descrição: Aí vai tutorial ensinar Como criar efito fumaça no Photoshop, mais conhecido como efeito Smoke.
1- Crie um novo documento e com a Ferramenta Pen Tool (P) você crie um shape: Criei algum dessa forma aleatória.
1- Crie um novo documento e com a Ferramenta Pen Tool (P) você crie um shape: Criei algum dessa forma aleatória.

2- Aplique um filtro para embassar: Vá em Filter> Blur> Gaussian Blur.

3- Agora com o Filter Liquify você vai mexendo nele como se fosse aleatória. Para fazer isso vá em Filter> Liquify. (Shift+Ctrl+X).

Possicione as formas.
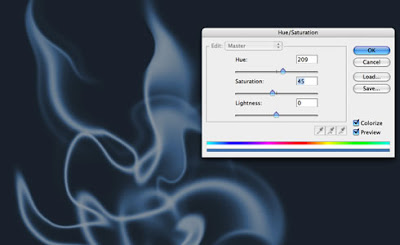
4- Vamos acrecentar algumas cores. A imagem tem que ter alguma cor de fundo já existente, caso contrário o Hue/Saturation não ira funcionar. Vá em Image> Adjustments> Hue/Saturation. (Ctrl+U).
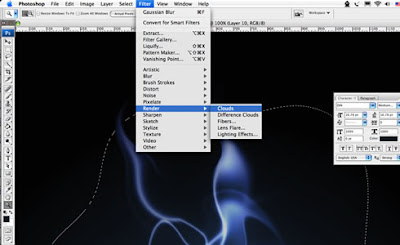
5- Crie uma seleção e add Clouds. Và em Filter> Render> Clouds.
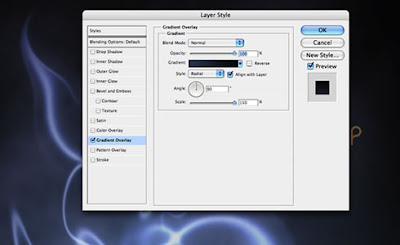
6- Crie uma new Layer e vá em Layer> Layer Style> Gradient Overlay.
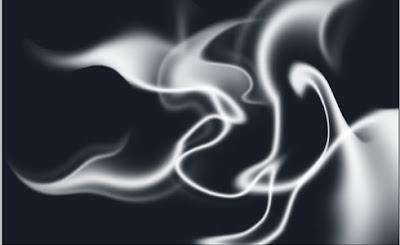
Resultado final.

Descrição: Aí vai tutorial ensinar Como criar efito fumaça no Photoshop, mais conhecido como efeito Smoke.
1- Crie um novo documento e com a Ferramenta Pen Tool (P) você crie um shape: Criei algum dessa forma aleatória.
1- Crie um novo documento e com a Ferramenta Pen Tool (P) você crie um shape: Criei algum dessa forma aleatória.
2- Aplique um filtro para embassar: Vá em Filter> Blur> Gaussian Blur.
3- Agora com o Filter Liquify você vai mexendo nele como se fosse aleatória. Para fazer isso vá em Filter> Liquify. (Shift+Ctrl+X).
Possicione as formas.
4- Vamos acrecentar algumas cores. A imagem tem que ter alguma cor de fundo já existente, caso contrário o Hue/Saturation não ira funcionar. Vá em Image> Adjustments> Hue/Saturation. (Ctrl+U).
5- Crie uma seleção e add Clouds. Và em Filter> Render> Clouds.
6- Crie uma new Layer e vá em Layer> Layer Style> Gradient Overlay.
Resultado final.
